 I'm always looking for some "cute" thing to carry my miscellaneous sewing supplies in for trips, classes and whatnot. With the arrival of a "Darla" fabric grab bag, I came up with the following pattern. Its roomy enough to carry a bunch of stuff, and quick to make. I made mine without a strap, but I included directions for one, since I know some people prefer them.
Here we go! What you'll need:
2 10 ½” squares for outside
2 10 ½” squares for lining
2 10 ½ x 3 ½” rectangles for contrast fabric
11” or longer all-purpose zipper
Coordinating thread
2 10 ½ x 9 ½ “ pieces of quilt batting
*12 x 4” strip for strap (optional)
* for optional strap: Press 12 x 4” strip in half, lengthwise. Open and fold sides toward center. Press. Topstitch along edges.
Press under ½” on one long side of each contrasting rectangle fabric.
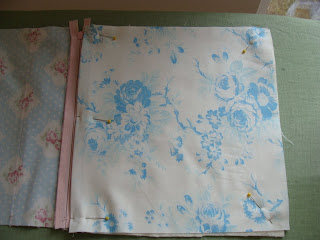
Line up raw edges along top and sides with 10 ½” squares for outside of clutch. Topstitch, using coordinating thread and a ¼” seam. Press under ½” along top edges of both rectangles. Line up zipper along top of fabric. Mark zipper tape along the edge of fabric. Make sure zipper pull is 1/4" away from other side of fabric. Take a needle and thread and whipstitch across zipper teeth, 1/4" in from mark. Clip excess zipper tape off.
 Open up seam allowances, center along zipper tape, and line up raw edges with outside of zipper tape, right sides together. Sew zipper to fabric. Repeat for other side, turning over seam allowances when done.
  Press under ½” along top edges of lining fabric squares. Layer outside fabric wrong side up, quilt batting square, the lining fabric right side up. Line up quilt batting along bottom and sides of outside fabric. Pin. Topstitch along edges of zipper.
 In order to stay close to zipper, I stop about an inch from the zipper pull. With the needle down, I lift the presser foot and pull the zipper back behind the needle. Then I continue sewing to the end.
 *If you choose to add a strap: Fold strap in half and pin to right side of outside fabric, about 1” down from zipper. Pin length of strap to center of outside fabric so that it does not get caught in seam.
Flip lining fabric so that it is right sides together and sew along sides and bottom, leaving a 2” opening in the center of the bottom for turning. Square two bottom corners by opening up pouch, match side seams, measure up 2" from point and mark. Stitch across line and clip corners. Repeat for outside fabric.
 Turn pouch right side out and slip stitch opening in lining closed. Insert lining into pouch. You’re done!
 Felt pattern by littledeer (I ordered mine today!)
 Headbands by xoxotova


